Showing posts with label Windows. Show all posts

Wednesday, October 16, 2013

Installing a new hard disk without reinstalling Ubuntu/Windows

I own a 7-year old Dell Inspiron 1420 laptop, which comes with a 160 GB hard drive. My optical drive stopped working a couple of years ago and I had been contemplating getting a secondary hard drive. The only thing that kept me from it was the whole process of reinstalling my dual boot configuration on it. While Ubuntu installation is not too difficult and is done pretty quickly, I really hate having to reinstall Windows. The OS installation alone takes up a lot of time, not to forget the time required for installing additional programs like a good web browser, PDF reader, a compression program, antivirus, an office suite and vlc/mplayer - these are perhaps the most basic necessities that are needed to make your Windows functional.

A couple of months back, I decided to finally get an additional drive 750 GB drive and a caddy to place it securely in place of my optical drive. Choosing a caddy is easy - you just need to take care of two things : the size of the optical drive (12.5 or 9 mm) and the interface (IDE/SATA) that it uses to connect the motherboard. This is the same interface which is used to connect your optical drive and can be checked when you take out your optical drive.

Cloning the hard disk

Important Note:  /dev/sda refers to the complete hard drive and includes all partitions. /dev/sda1 refers to a specific partition of the same hard drive.

My home folder is on the same partition as the Ubuntu install. So I just cloned the two partitions using the terminal. My Ubuntu and Windows partitions were on /dev/sda1 and /dev/sda2 respectively. A good way to make sure you have the correct partition is to use the GParted tool (included in the Live CD) or the fdisk -l command at the terminal.
user@pc: ~$ sudo fdisk -l
Then I connected my external drive and used the following commands:
user@pc: ~$ dd if=/dev/sda1 of=/media/EXTERNAL/Ubuntu.img bs=4096
user@pc: ~$ dd if=/dev/sda2 of=/media/EXTERNAL/Win7.img bs=4096
I used this method because it does not require installing additional programs. For more ways of cloning, this article on lifehacker is a good read.

In the meantime, I used unetbootin to create a Ubuntu bootable USB. When the backup was done, I simply shut down my computer and replaced my primary hard drive with the new spacious one I had bought. The next step was to boot into Ubuntu using the live USB I had just made and then partition the new drive. I made a partition system similar to my previous one -
1. ext4 (Ubuntu)
2. NTFS (Windows 7)
3. NTFS (storage of common data files like Dropbox/Firefox profile/Music/etc.)

Note that I do not use any separate swap partition on my computer.

Of course, I made sure that the new partitions were at least the same size or bigger than the previous ones to ensure that the image file can be written back on them. When the partitions were made and properly formatted, I restored the OS installations on my new drive using the following commands:
user@pc: ~$ dd if=/media/EXTERNAL/Ubuntu.img of=/dev/sdb1 bs=4096
user@pc: ~$ dd if=/media/EXTERNAL/Win7.img of=/dev/sdb2 bs=4096
Yes, the new hard drive was mounted as /dev/sdb in my case. But you should check using the fdisk -l command to make sure you are restoring the images on the correct drives/partitions. Now, we are almost done.

Reinstalling the bootloader

One thing to notice here is that I cloned individual partitions instead of the whole drive. While this would have been also possible, I did it this way because I did not have enough free space on my external disk. Which is why the next step becomes important. I have two OS installations on the new hard drive now but no bootloader. To make this computer recognize the OS installs, I installed grub2 on the drive in the following way (Source: HowToUbuntu):

1. While still in the live CD/USB environment, open a terminal and mount the partition your Ubuntu Installation is on. Again, it can be found out by using GParted or the fdisk command.
user@pc: ~$ sudo mount /dev/sdb1 /mnt  
2. Now bind the directories that grub needs access to to detect other operating systems, in the following fashion
user@pc: ~$ mount --bind /dev /mnt/dev && sudo mount --bind /dev/pts /mnt/dev/pts && sudo mount --bind /proc /mnt/proc && sudo mount --bind /sys /mnt/sys
3. Now we need to change the apparent root directory of the live environment to the one on the Ubuntu partition we just mounted
user@pc: ~$ sudo chroot /mnt
4. Now install, check, and update grub. Grub is installed on the whole drive and not a single partition, so use /dev/sdb instead of /dev/sdb1 for the following set of commands
user@pc: ~$ grub-install /dev/sdb
user@pc: ~$ grub-install --recheck /dev/sdb
user@pc: ~$ update-grub
5. Now the grub installation is complete. All that is left is to exit the chrooted system and unmount everything.
user@pc: ~$ exit && sudo umount /mnt/dev && sudo umount /mnt/dev/pts && sudo umount /mnt/proc && sudo umount /mnt/sys && sudo umount /mnt
6. Shut down and turn your computer back on, and you will be met with the default grub2 screen.

That's it! Now you should have a completely running system with the same configuration as you had before. I have not tried doing this with a significant change in the system configuration. Even with those changes, Ubuntu should port to the new system configuration just fine. The only problem that you could face is with Windows because sometimes its WGA kicks in if it detects a change in your hardware.

Monday, August 15, 2011

Dual Boot Windows and Ubuntu (with Ubuntu installed first)

I use my laptop for a number of purposes, and gaming is not one of them, and it works just fine with Ubuntu 11.04 as the sole OS. However, I recently decided to let go of my desktop and realized my laptop was not ready as a complete replacement yet. Now, I had two options : installing Windows on a virtual machine using VirtualBox or setting up a dual boot. The first is a very good option, especially if you have enough RAM and a decent processor; and it also has the advantage of switching between the OS a breeze. However, with my limited resources, I settled on the second option.

The easiest way to set up a dual boot on a computer with Windows already installed is by Wubi. Setting up a dual boot on computer with Ubuntu installed is a little more complicated than that.


Here is what you will need:
1. Windows ISO OR Windows Installation CD/USB
2. Ubuntu ISO OR Ubuntu Live CD/USB
3. USB Drive
4. UNetbootin
Note: If you wish to install Windows 7, you can also use A Bootable USB to burn the ISO. It needs a Windows host, though.

Step1. Download the Ubuntu ISO and UNetbootin. The installation instructions for UNetbootin for both Windows and Linux are here. You may skip the manual download of the Ubuntu ISO as UNetbootin can also do the same for you. It is simply a matter of choice.

Step2. Run UNetbootin. Select Diskimage>ISO and enter the path for the Ubuntu ISO file. Alternatively, you may download the distribution of your choice directly from the internet. Then Select USB Drive as the Type and sdbX (where X is usually 1) as the Drive. Click OK.


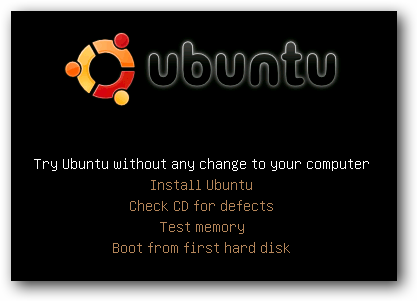
Step3. Now, you need to have your partitions in place. With Ubuntu as the sole OS, there would typically be two partitions - Ubuntu Installation Partition and Swap. You would need to resize the Ubuntu partition using GParted to make space for a Windows installation - you can only do this using a Ubuntu Live CD/USB. Select the Try Ubuntu option and go to System>Administration>GParted to make the partitions.


The Ubuntu partitions are typically in ext3 or ext4. Windows and other shared partitions should be NTFS. For my computer, I have set up two 30 GB partitions for Ubuntu and Windows installations, and another 80 GB for the common data - Dropbox, Music, Documents, etc. The other 5 GB is in Swap.

Step4. Repeat the steps 1 and 2, with the Windows ISO instead of Ubuntu ISO. The size of the USB drive used in this step should be at least 4 GB.

Important: If you are just overwriting the same USB drive used in Step2, remember to copy the Ubuntu ISO in a common drive before proceeding. Windows CANNOT access the Ubuntu filesystem and you may have to re-download the Ubuntu ISO if you do not have a backup.

Step5. Now, restart your computer and ensure that the USB drive is given the highest preference in your boot sequence in the BIOS settings. Boot your computer using the USB drive and install Windows.

Step6. After Windows has been installed, you will realize that you are unable to access the Ubuntu partition. This is because Windows overwrites the MBR. At this point of time,you would require UNetbootin and the Ubuntu ISO again. Repeat steps 1 and 2.

Step7. To restore the MBR, we will make use of a free software called Boot-Repair. Boot your computer using the Ubuntu Live USB. Select the Try Ubuntu option and run the terminal. Type in the following commands in the terminal:

sudo add-apt-repository ppa:yannubuntu/boot-repair
sudo apt-get update && sudo apt-get install -y boot-repair

Step8. Finally, fire up Boot-Repair and select First Repair and click Apply.


Bingo! The dual boot has been set up successfully on your computer. Now, you can merge your Dropbox, Firefox, Pidgin and Thunderbird profiles between Ubuntu and Windows so that your settings for chat and internet are always synced. The simplest way to do it is to set it up in Windows or relocating the profile from Ubuntu to Windows folder, as Windows cannot access the Ubuntu filesystem.

For Firefox, you can always use Firefox Sync or XMarks to sync all settings between different computers and also the different OS on the same computer. But, sharing a single profile is more convenient and logical for the same computer.

Monday, August 8, 2011

Log into your remote computer (even with a dynamic IP!)

Every now and then, I need to access my remote desktop at home for a variety of reasons - the file I wanted to access is not in my Dropbox folder, the torrent queue needs to be prioritized or just logging in just for the fun of it! Thankfully, there exist a myriad of solutions for this very problem - VNC clients and Microsoft's very own "Remote Desktop". However, we forget a very basic requirement for either of these to work - we need to know the external IP of our remote desktop.

Now, there are a number of options available - most ISPs provide an option for a static IP Internet connection, albeit for monthly premium. It is also possible to do it by registering for DNS services. These services work by installing a client on your remote computer that keeps mapping your IP to a more friendly name like mycomputer.myvnc.com. Although this is quite useful, I personally find it quite tedious because of the hassle of constantly logging into their site and enabling my account - some of the free ones require you to do that periodically. Not to mention, I could never get it to work like it should.

Here is an alternate, simpler and free solution to the problem and it makes good use of Dropbox! Here is what we will need:
- Dropbox
- VNC Server
- Windows Task Scheduler
- wget
- VNC Client


Step1. Install Dropbox your remote computer if you haven't already done that.
http://www.dropbox.com

Step2. Install a VNC Server on you remote computer. You can choose from Tight VNC, Real VNC, and the like.


Step3. Download wget from the link below and save the wget executable file in a Dropbox folder (for e.g. \Dropbox\IP Updater)
http://users.ugent.be/~bpuype/wget/wget.exe

Step4. Create a batch file in your Dropbox folder that runs the following command.
wget -q -O - http://whatismyip.com/automation/n09230945.asp > IP.txt

Step5. Now, open the Task Scheduler and create a task that executes the above batch file every hour.

Step6. Presto! Simply log into your Dropbox account from anywhere in the world and you will be able to keep a tab on the most recent IP of your remote computer.  Use this IP (in the IP.txt file) to log in remotely using Tight VNC/Real VNC client!

Although the above solution works for a Windows machine, it can be tweaked slightly to work for Linux/Mac as well.